Super-dense Coding
An in-depth discussion about super-dense coding, a very important topic in quantum communications.
Table of contents
- Preliminaries
- What is it?
- Quantum Entanglement
- Operations Performed by Alice
- Operation Performed by Bob
- A comparison of the journey of the qubits for better comprehension
- Example demonstrating the mechanism of operation on state |11>
- Qiskit Code to implement super-dense coding
- Final Code and Circuit Diagram for Super-Dense Coding
- Output:
- Conclusion and Adieu !
Preliminaries
None at all! Delving into Quantum Computing can be, for the lack of a better word, overwhelming. However, Congratulations! You have made it to the point where you are now curious about the extremely interesting topic of super-dense coding in quantum computing. Without further delay, let's jump right into it.
Note: I have designed this article in a manner such that only a basic understanding of qubits gates and quantum entanglement will be helpful to readers who are new to this field.
What is it?
Let's assume two entities Bob and Alice who are friends. Now, Alice wants to send two bits of classical information to Bob( i.e. two classical bits). Sounds fairly simple. However, here's the catch. Alice is restricted to sending only a single qubit to Bob. So basically, we have to figure out a way by using our quantum armament so that Alice can send Bob both bits of classical information to Bob seamlessly.
Quantum Entanglement
Alice and Bob have a shared entangled qubit pair. As we know, an entanglement of two qubits takes place after applying a Hadamard's gate on the first qubit and a CNOT gate with the first qubit as a control and the second cubit as a target. Here's the quantum circuit for quantum entanglement.

I will publish a separate article about superimposition and quantum entanglement soon where I will go into further details of the above topic. For now, let's go ahead with the knowledge that

Python code to draw the above circuit
from qiskit import QuantumCircuit, Aer, execute

# Create a quantum circuit with two qubits
qc = QuantumCircuit(2, 2)

# Apply Hadamard gate to the first qubit
qc.h(0)

# Apply Controlled-NOT gate with the first qubit as the control and the second qubit as the target
qc.cx(0, 1)

# Measure both qubits and store the results in classical bits
qc.measure([0, 1], [0, 1])

# Draw the circuit
print(qc)
Feel free to implement this on Jupyter Notebook or Google Colaboratory or any other IDE that suits you. However, although very important it's perfectly fine if you do this later on.
Operations Performed by Alice
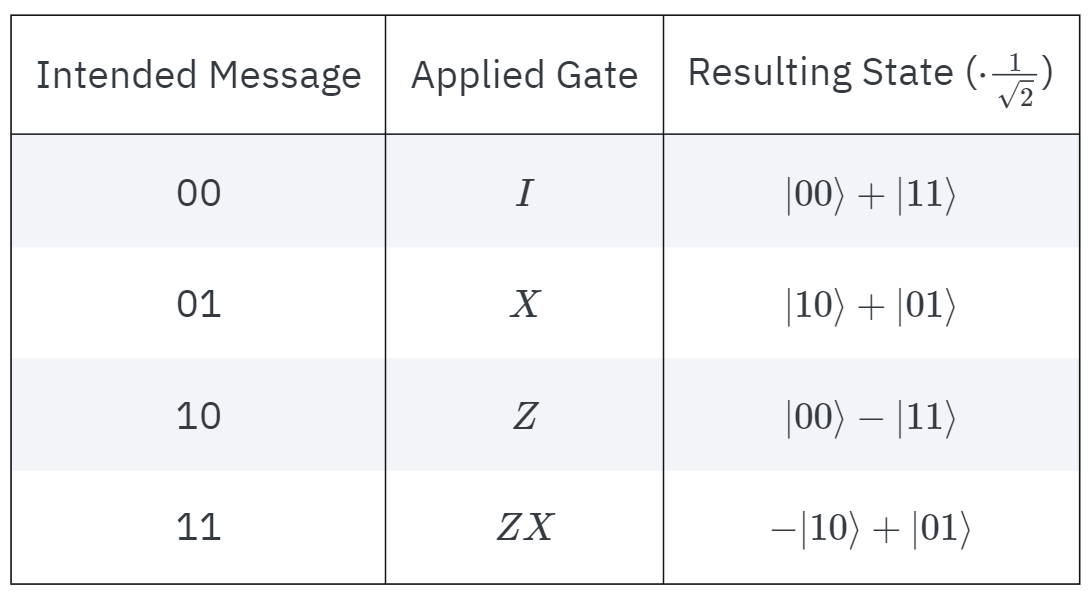
Let the two bits of message that Alice plans to send to Bob be b1 and b2. Now, Alice applies an X gate to her share of the entangled qubit pair if b1 is 1 and then applies a Z gate to the same qubit( her qubit ) if b2 is also 1. Basically, she applies a conditional X and conditional Z gate on her qubit with b1 and b2 as the controls respectively.
Note: Remember Alice can perform operations on only her share of the shared entangled qubit pair. She has no right to perform any operation or manipulate Bob's share of the qubit in any way whatsoever.
This qubit is now sent to Bob through a classical channel.
The following is a basic representation of the operation performed by Alice:

More information about how to apply Z and X gates to the information to Encode the message will be later provided in an example where a message will be encoded, sent and decoded.
Operation Performed by Bob
Bob, now is left with the herculean task of figuring out what the original message was that Alice had intended to send. This is because all he receives from Alice is a single qubit and in addition to that he has a qubit which was entangled with Alice's qubit all along the way. Bob, being a smart guy performs something known as Bell State Measurement to reconstruct the original state of the qubit.
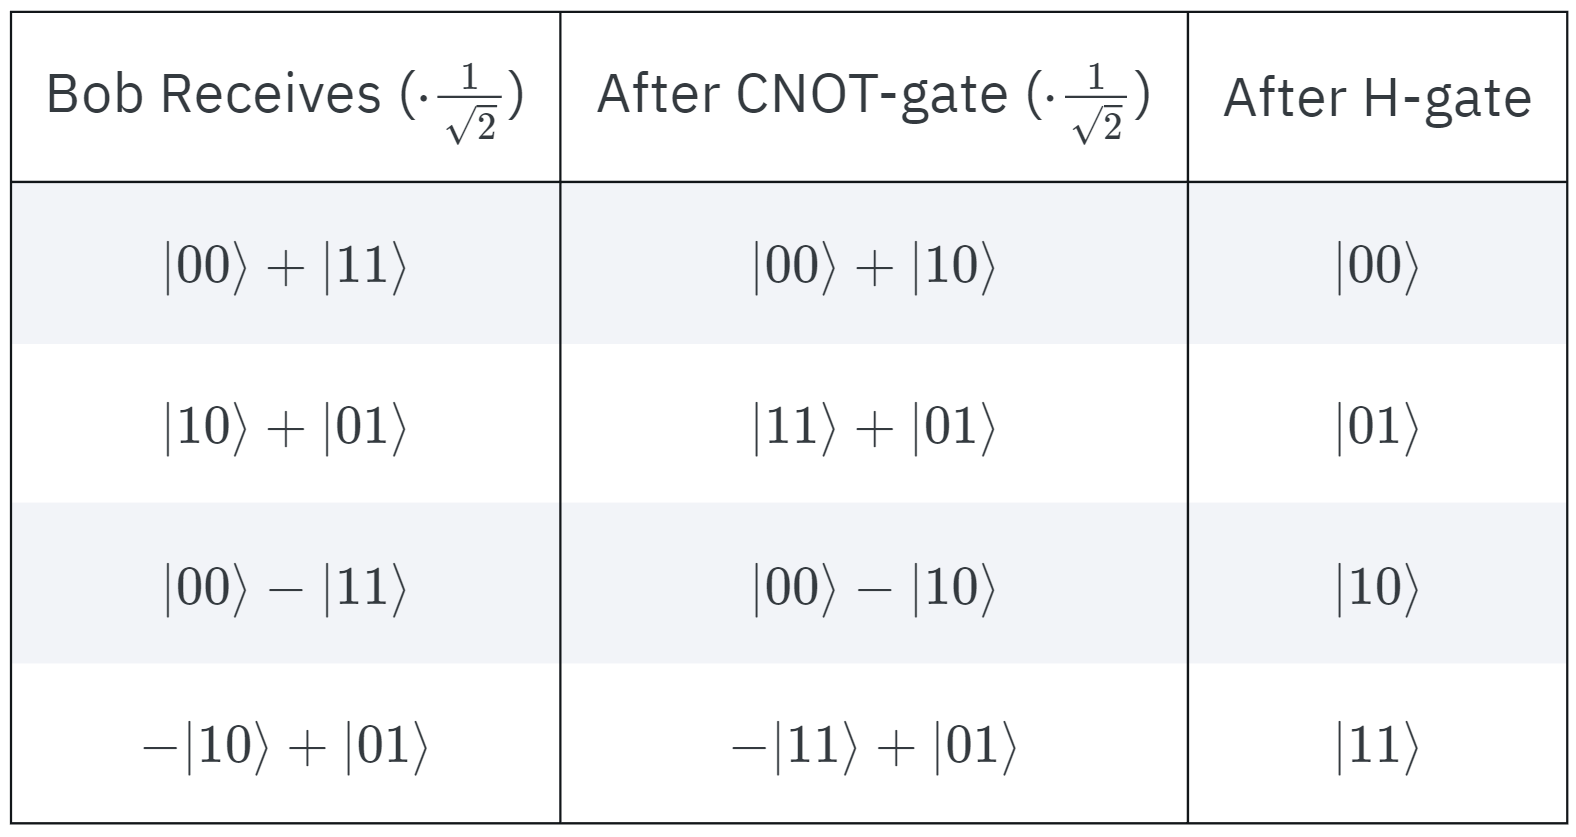
Bell State Measurement basically directs Bob to apply CNOT on his qubit controlled on the received qubit and then applies an H-gate on the received qubit. Measuring both the qubits now, Bob can finally retrieve the original bits b1 and b2.

A comparison of the journey of the qubits for better comprehension


Notice how the initial message(state of the Qubit pair) is restored at the end after being transferred from Alice to Bob.
Example demonstrating the mechanism of operation on state |11>
As an example let's consider Alice wants to send the message b1b2=11 to Bob. She has an entangled pair shared with Bob. Now, since b1=1, she performs X gate on her qubit.

Now, since b2 is also 1, she performs Z gate on her qubit in the already superimposed state.

Now, Alice sends her qubit to Bob, which he then uses to perform CNOT operation on his qubit and finally perform H-gate on the received qubit. Upon completion, the originally intended message(11) reveals itself.


Qiskit Code to implement super-dense coding
Output:
#Importing the classes and modules
from qiskit import *
#Creating quantum register , classical register
#and quantum circuit.
q = QuantumRegister(2)
c = ClassicalRegister(2)
qc = QuantumCircuit(q,c)

#Let's define the message to be sent
b1=1
b2=1
#Creating entanglement between the qubits q[0] and q[1]
qc.h(q[0])
qc.cx(q[0],q[1])
#Alice applying the controlled operations on q[0]
if(b1==1):
  qc.x(0)
if(b2==1):
  qc.z(0)

#Bob applying the CNOT and H operations
qc.cx(q[0],q[1])
qc.h(q[0])
#Measuring the qubits to obtain the message
qc.measure(q[0],c[0])
qc.measure(q[1],c[1])

#Executing the circuit in the simulator
backend = Aer.get_backend("qasm_simulator")
qjob = execute(qc ,backend)
counts = qjob. result(). get_counts()
print (counts)
# print(qc)

Feel free to play around with this code by changing the values of b1 and b2.
A brief explanation of the code
In the code, we consider 1 quantum register q consisting of two qubits and 1 classical register c consisting of one classical bit. We also establish a quantum circuit qc which incorporates both of these registers. To create an entanglement between the two qubits of the quantum register, we apply the H-gate on the first qubit and then the conditional X gate on the second qubit controlled on the first qubit. Alice then applies the controlled x and controlled z operations on q[0]. After that, Bob applies CNOT and H operations on the qubits and the results are stored in classical bits c[0] and c[1] after measuring the qubits. For a standard qasm_simulator backend, the number of shots is set to 1024. As is visible from the result, super-dense coding is being satisfied for all 1024 shots of the program that is being executed.
Final Code and Circuit Diagram for Super-Dense Coding
#Importing the classes and modules
from qiskit import *
#Creating quantum register , classical register
#and quantum circuit.
q = QuantumRegister(2)
c = ClassicalRegister(2)
qc = QuantumCircuit(q,c)

#Let's define the message to be sent
b1=1
b2=1
#Creating entanglement between the qubits q[0] and q[1]
qc.h(q[0])
qc.cx(q[0],q[1])
#Alice applying the controlled operations on q[0]
if(b1==1):
  qc.x(0)
if(b2==1):
  qc.z(0)

#Bob applying the CNOT and H operations
qc.cx(q[0],q[1])
qc.h(q[0])
#Measuring the qubits to obtain the message
qc.measure(q[0],c[0])
qc.measure(q[1],c[1])

#Executing the circuit in the simulator
backend = Aer.get_backend("qasm_simulator")
qjob = execute(qc ,backend)
counts = qjob. result(). get_counts()
#print (counts)
#execute the above line if you want to check the decoded message
print(qc)
Output:

This is the final quantum circuit diagram for super-dense coding. Note that the [M] signifies the measurement of the qubits 0 and 1.
Here's a better representation of the above circuit using the mpl renderer in Python.

Conclusion and Adieu !
Congratulations on completing this article about super-dense coding! You have successfully explored a fascinating concept in quantum communication. By understanding the principles behind super-dense coding, you are now equipped with knowledge about utilizing entanglement and quantum gates to transmit information more efficiently.
I hope this article was as exciting for you to read as it was for me to write. I certainly had a wonderful time writing and researching more about this very important topic in Quantum Communications.
Yet again, congratulations on your accomplishment, and best of luck in your future endeavours in the world of quantum computing!
